Disk Space Analyzer
The Disk Space Analyzer gives you a single view of all storage consumed by your virtual machines, templates, and snapshots. It shows both the allocated (actual on-disk) size and the configured (maximum) size for every item, lets you drill into individual disks, resize disks without leaving the analyzer, and take quick actions on VMs, templates, and snapshots directly from the list.
Open it from Tools → Disk Space Analyzer.
🔝 Toolbar
| Button | Action |
|---|---|
| 📊 Export as CSV | Save disk usage data as a CSV spreadsheet |
| 📷 Export as PNG | Save the current analyzer view as a PNG image |
| 🔄 Refresh | Recalculate disk usage and reload all items |
| ❓ Help | Open this help page |
📊 Sections
The analyzer is divided into three collapsible sections. All sections start collapsed when the window opens. Click the disclosure triangle to expand a section.
Each section header shows:
- A progress bar representing total allocated vs. configured space across all items in that section
- A size label in the format X.X / Y GB (allocated / configured), or X.X GB if no configured size is set
- The label turns red and the bar fills red when usage exceeds 85%
🖥️ Virtual Machines
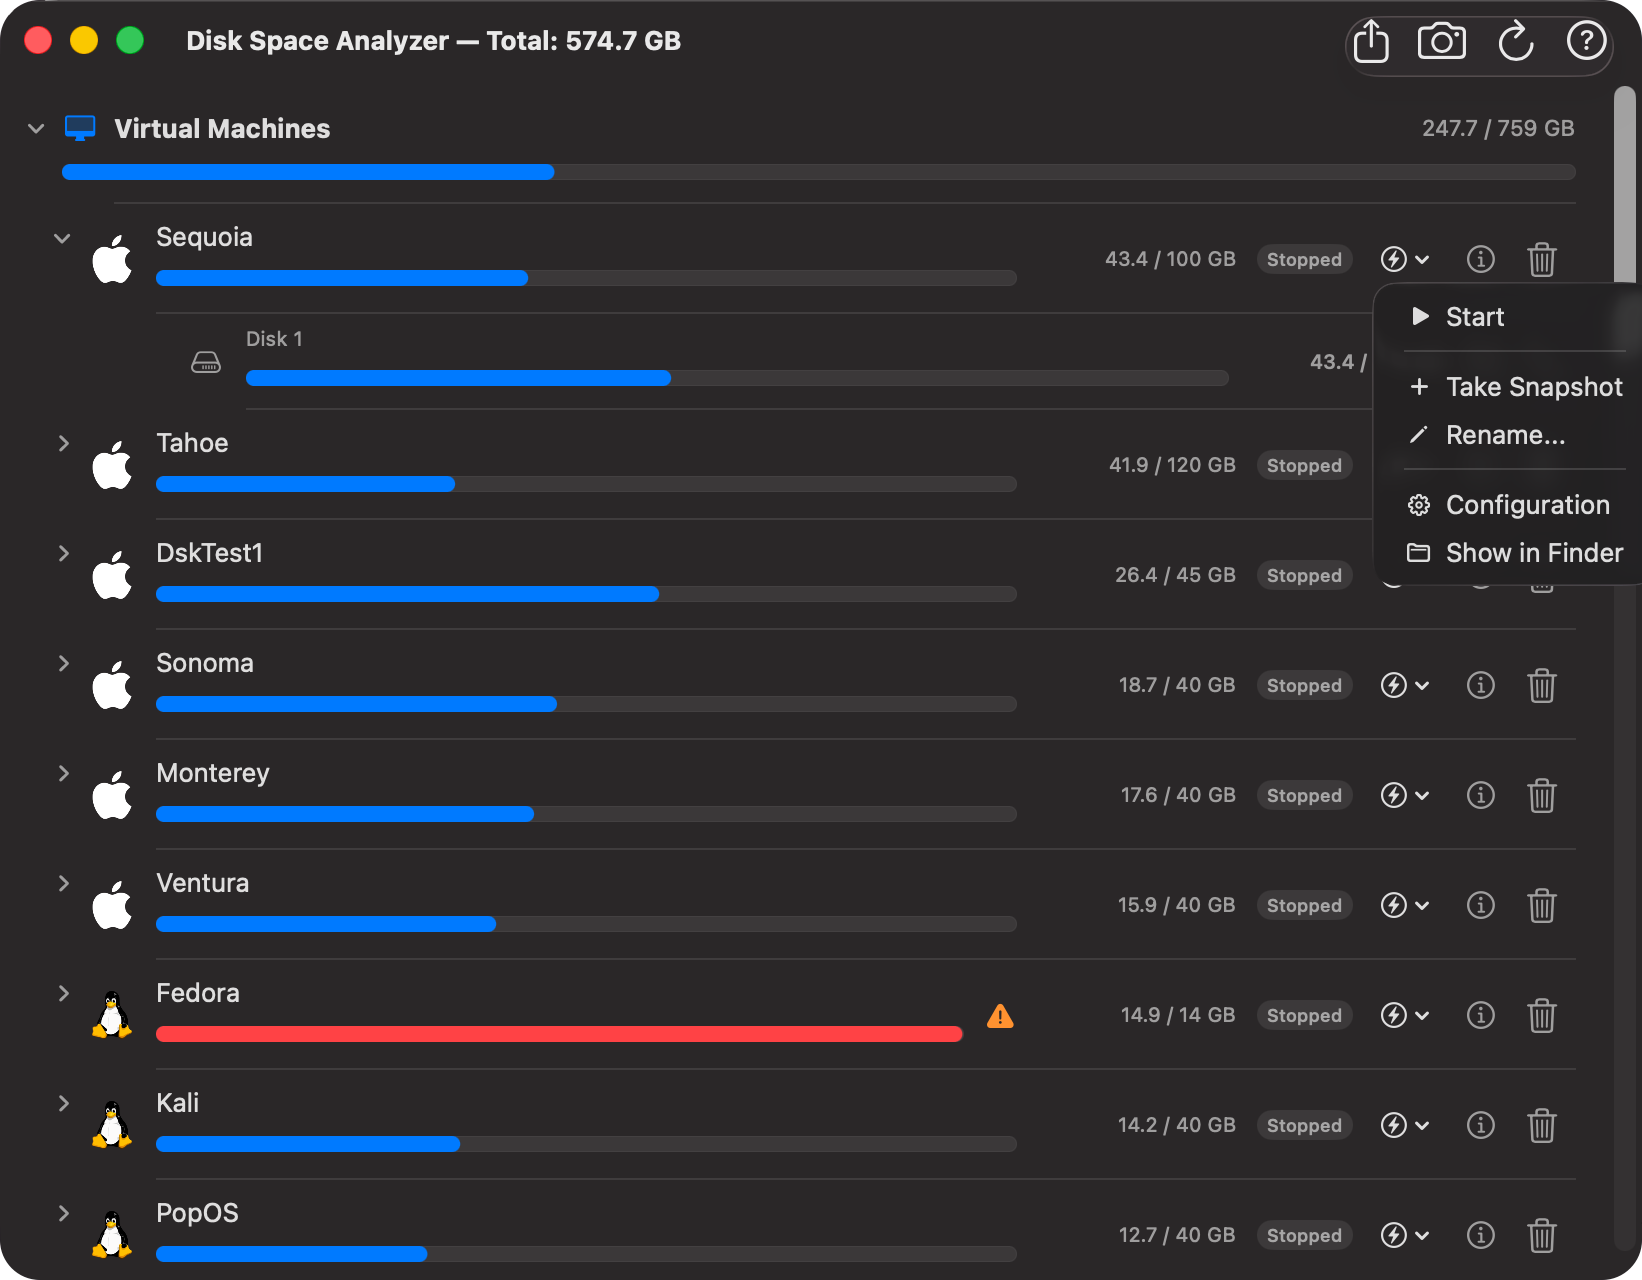
Lists all your virtual machines sorted by disk usage, largest first.
Each VM row contains:
- OS icon — macOS or Linux icon matching the VM
- Name with a progress bar showing how full the disk is
- ⚠️ Warning badge — shown when usage exceeds 85%
- Size label —
X.X / Y GB(allocated / configured) - State badge — shows the current VM state:
Running(green),Paused(yellow),Stopped(gray), orSuspended(blue). Updates automatically when the VM state changes — no refresh needed. - ⚡ Quick Actions menu — see VM Quick Actions below
- ℹ️ Quick Info — shows VM configuration and usage statistics in a popover
- 🗑️ Delete — permanently deletes the VM and all its data with a confirmation dialog
Note: Deleting a VM also removes all its associated snapshots. This action cannot be undone.
VM Quick Actions
Click the ⚡ button on a VM row to open the quick actions menu. The menu is dynamic — it shows different options based on the current VM state:
When Stopped or Suspended:
| Action | Description |
|---|---|
| ▶ Start / Resume | Start or resume the virtual machine |
| Take Snapshot | Create a new snapshot of the stopped VM |
| Rename… | Rename the virtual machine |
| Configuration | Open the VM configuration window |
| Show in Finder | Reveal the .vpvm bundle in Finder |
When Running:
| Action | Description |
|---|---|
| Stop | Force stop the virtual machine |
| Shutdown | Gracefully request the VM to shut down |
| Pause | Pause the running virtual machine |
| Suspend | Save machine state and suspend (Apple Silicon only, macOS 14+) |
| Configuration | Open the VM configuration window |
| Show in Finder | Reveal the .vpvm bundle in Finder |
When Paused:
| Action | Description |
|---|---|
| ▶ Resume | Resume the paused virtual machine |
| Configuration | Open the VM configuration window |
| Show in Finder | Reveal the .vpvm bundle in Finder |
When Locked:
When a VM has a password lock set, the ⚡ quick action button is replaced by a 🔒 lock button. Click it to open the unlock dialog and enter the password. Once unlocked, the ⚡ quick action menu becomes available again.
📄 Templates
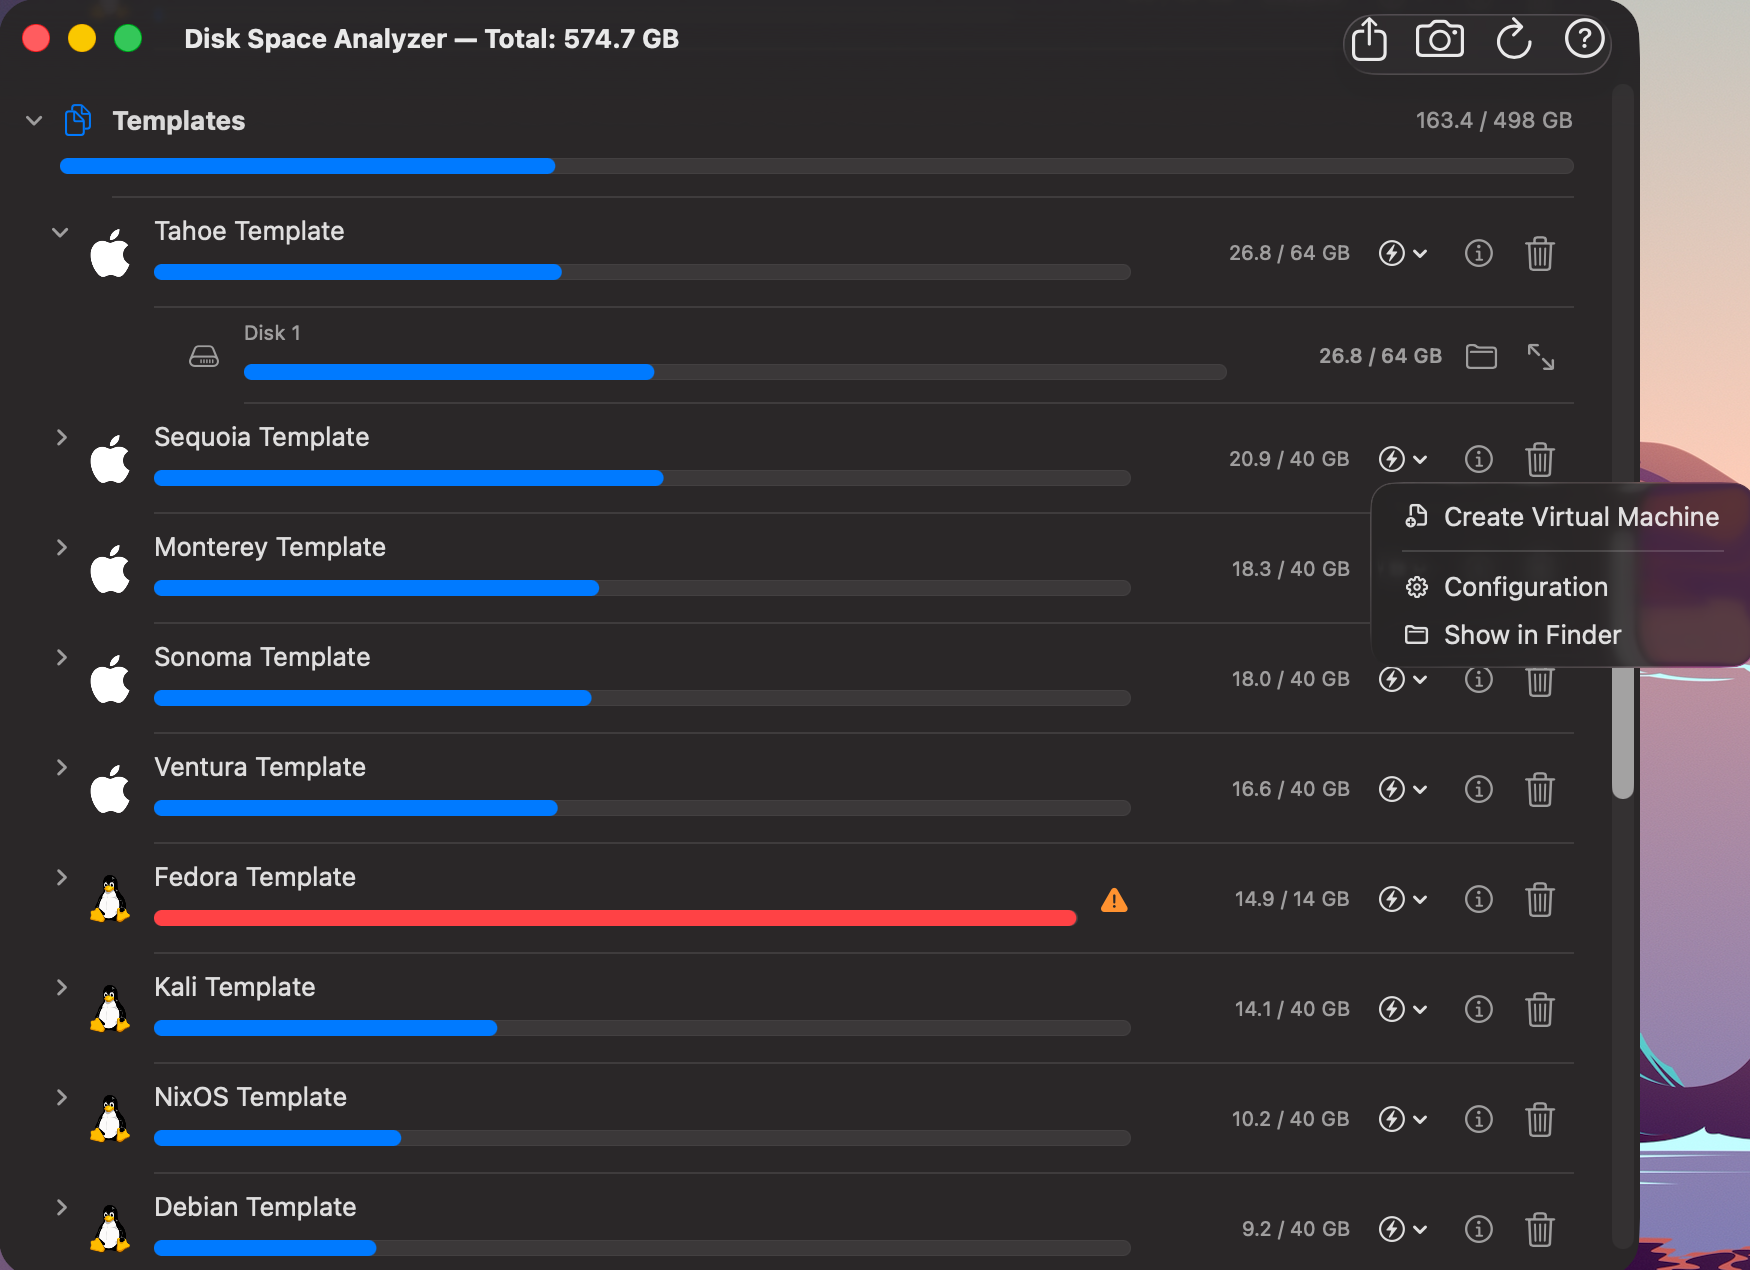
Lists all saved VM templates sorted by disk usage, largest first.
Each template row contains:
- OS icon — macOS or Linux icon matching the template
- Name with a progress bar showing how full the disk is
- ⚠️ Warning badge — shown when usage exceeds 85%
- Size label —
X.X / Y GB - ⚡ Quick Actions menu:
| Action | Description |
|---|---|
| Create Virtual Machine | Create a new VM from this template |
| Configuration | Open the template configuration window |
| Show in Finder | Reveal the .vpvm bundle in Finder |
- ℹ️ Quick Info — shows template configuration details in a popover
- 🗑️ Delete — permanently deletes the template with a confirmation dialog
🕘 Snapshots
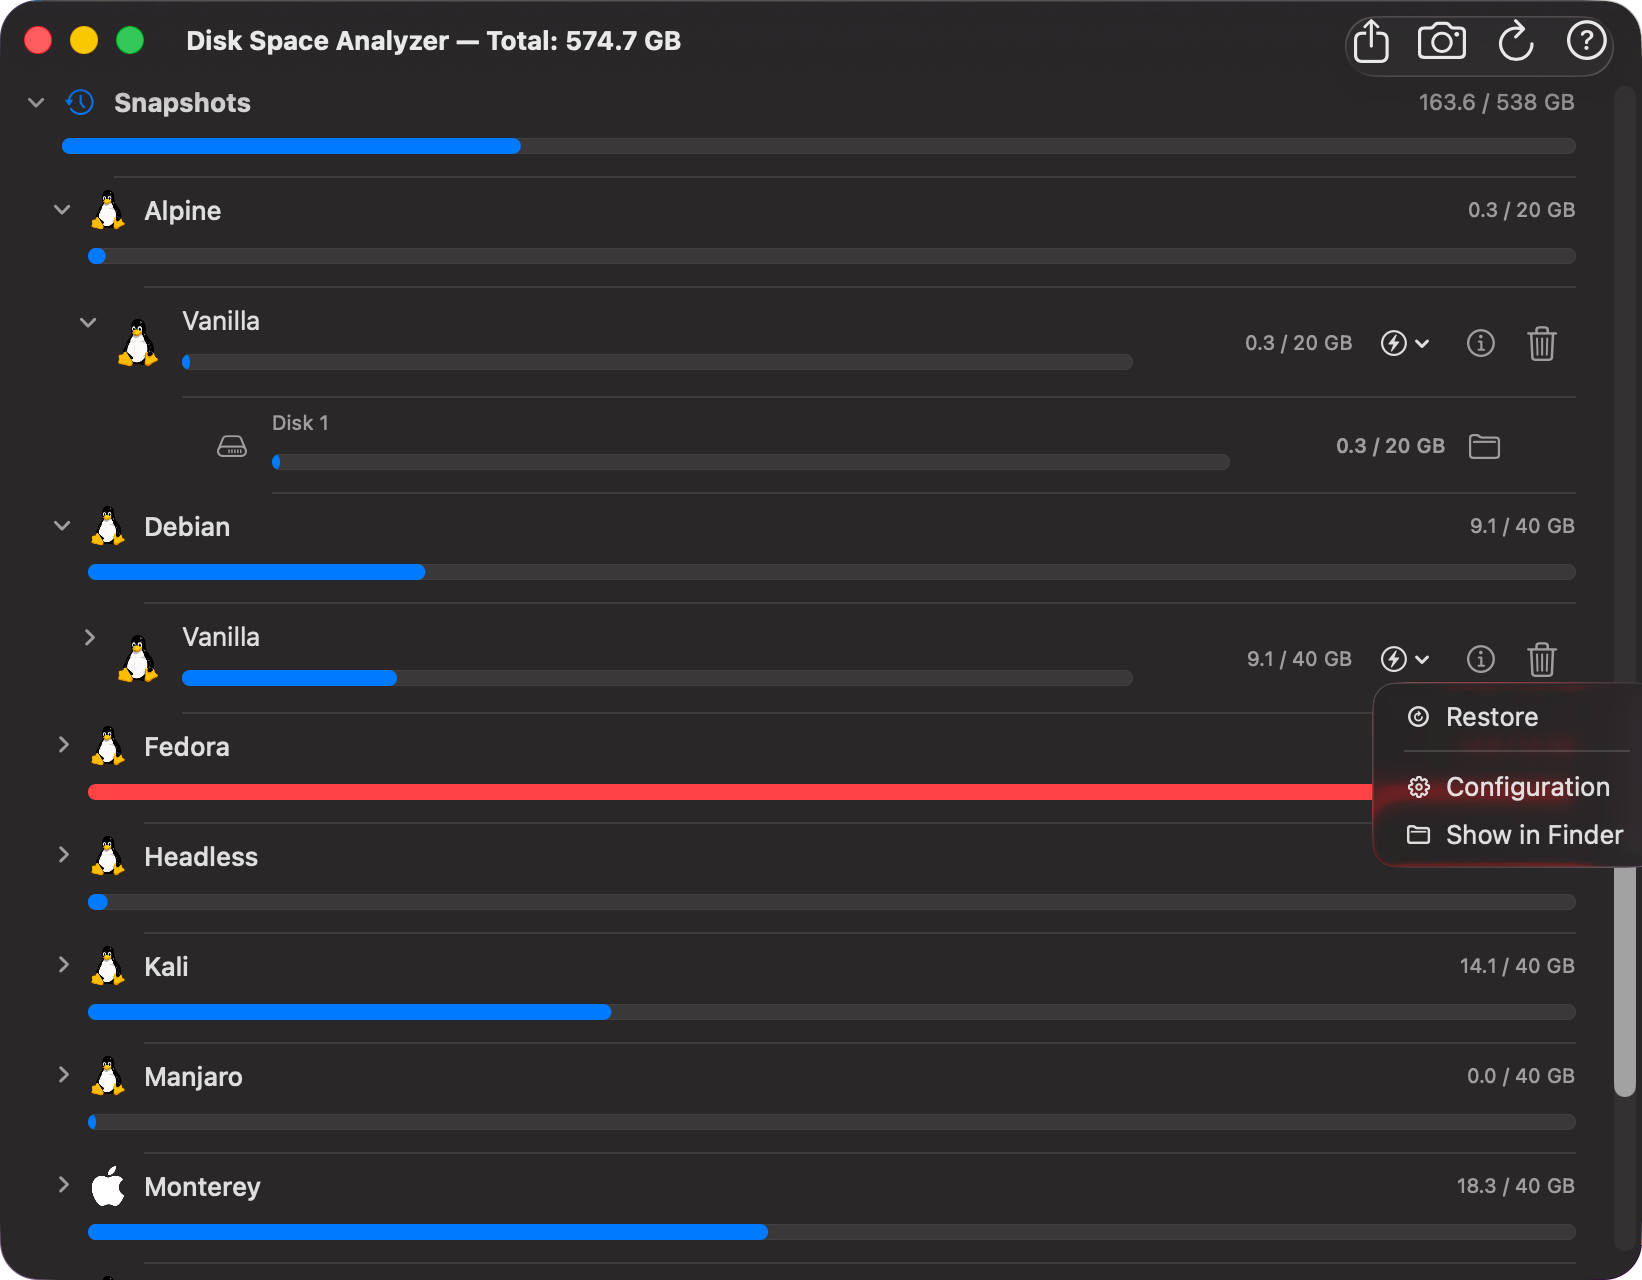
Groups snapshots under their parent VM. Each VM group has its own collapsible header showing the combined usage of all its snapshots.
Each snapshot row contains:
- OS icon — macOS or Linux icon matching the parent VM
- Name with a progress bar showing how full the disk is
- ⚠️ Warning badge — shown when usage exceeds 85%
- Size label —
X.X / Y GB - ⚡ Quick Actions menu:
| Action | Description |
|---|---|
| Restore | Restore the VM to this snapshot state (VM must be stopped) |
| Configuration | Open the snapshot configuration window |
| Show in Finder | Reveal the snapshot bundle in Finder |
- ℹ️ Quick Info — shows snapshot configuration details in a popover
- 🗑️ Delete — permanently deletes the snapshot with a confirmation dialog
Note: Restoring a snapshot overwrites the current VM state. This action cannot be undone.
💽 Disk Sub-Rows
Click the disclosure triangle on any VM, template, or snapshot row to expand its individual disks. Each disk sub-row shows:
- Disk icon (
internaldrive) - Disk filename (e.g.
disk-0.img) - Progress bar showing how full that specific disk is
- ⚠️ Warning badge — shown when usage exceeds 85%
- Size label —
X.X / Y GB - 📁 Show in Finder — reveals the specific
.imgfile in Finder - Resize button (↔) — available on VM and template disks only (not snapshots)
Disk sub-rows are also selectable — clicking a disk sub-row highlights it in blue.
↔️ Resize Disk
Click the resize button (↔) on a disk sub-row to open the Resize Disk sheet.
The sheet shows: - The VM or template name and disk filename - Current size of the disk - New size — set using the text field or stepper (minimum: current size + 1 GB, maximum: 500 GB, step: 5 GB)
Important: Disk resize only supports increasing the size. Shrinking a disk is not supported.
Constraints
| Condition | Behaviour |
|---|---|
| VM is currently running | Resize is blocked — stop the VM first |
| Dynamic disk on macOS < 14 | Resize is blocked — requires macOS 14 or later |
| Disk file not found | Resize is blocked with an error message |
macOS Fixed Disk — Recovery Partition
After resizing a fixed disk belonging to a macOS VM or template, you will be prompted:
Do you want to relocate the recovery partition to end of disk?
- OK — relocates the recovery partition to the end of the newly expanded disk. After this completes, run the following command inside the macOS guest to expand the APFS container:
- Cancel — skips relocation. The disk is resized but the recovery partition remains at its original position.
Dynamic Disk
The resize sheet shows an info label for dynamic disks:
Dynamic disk — requires macOS 26+
Dynamic disk resize uses Apple's ASIF (Apple Sparse Image Format) framework and is only available on macOS 26 Tahoe or later.
ℹ️ Quick Info
Click the ℹ button on any VM, template, or snapshot row to open a Quick Info popover showing the item's configuration details.
- VM rows — shows CPU, memory, disk setup, notes, and a link to view full usage statistics
- Template rows — shows CPU, memory, and disk configuration
- Snapshot rows — shows the snapshot's configuration at the time it was taken
⚠️ Warning Indicator
A warning badge appears on any row (item or disk sub-row) where the allocated space exceeds 85% of the configured size. The progress bar and size label also turn red.
📊 Export as CSV
Click the Export as CSV toolbar button to save disk usage data as a spreadsheet. The CSV contains six sections:
| Section | Columns |
|---|---|
| Virtual Machines | Name, Allocated GB, Configured GB, Usage %, Warning |
| Virtual Machine Disks | VM, Disk, Allocated GB, Configured GB, Usage %, Warning |
| Templates | Name, Allocated GB, Configured GB, Usage %, Warning |
| Template Disks | Template, Disk, Allocated GB, Configured GB, Usage %, Warning |
| Snapshots | VM, Snapshot, Date, Allocated GB, Configured GB, Usage %, Warning |
| Snapshot Disks | VM, Snapshot, Disk, Allocated GB, Configured GB, Usage %, Warning |
Tip: Open the CSV in Numbers or Excel to sort, filter, and build charts from your disk usage data.
📷 Export as PNG
Click the Export as PNG toolbar button to save a snapshot of the analyzer as an image. The export includes:
- The total disk usage header
- All three sections (Virtual Machines, Templates, Snapshots) with their progress bars
- All item rows with individual disk sub-rows
- A timestamp at the bottom
Tip: Use the exported PNG to share a storage report with your team or keep as a reference before cleaning up old snapshots.
💡 Tips
- Largest items first — within each section, items are sorted by allocated size so the biggest consumers are always at the top.
- State badge updates live — the VM state badge updates automatically as VMs start or stop, so you can see at a glance which VMs are running without switching to the main window.
- Quick actions without switching windows — use the ⚡ menu to start, stop, pause, or take a snapshot of a VM directly from the analyzer.
- Snapshots accumulate quickly — expand the Snapshots section regularly to identify old or large snapshots, then use the ⚡ menu to restore or delete them.
- Resize without opening config — use the disk sub-row resize button to grow a disk directly from the analyzer, without navigating to the full configuration view.
- Quick Info on any item — click ℹ on any row to inspect CPU, memory, and disk configuration without opening a separate window.
- Locked VMs show a lock icon — if a VM has a password lock set, the ⚡ button is replaced by 🔒. Click it to unlock before accessing quick actions.