Control Center
The Control Center is the primary interface of VirtualProg where all your virtual machines (VMs) are listed and managed. It allows quick access to actions such as launching, configuring, tagging, and monitoring virtual machines.
🖥️ Idle Virtual Machines
When virtual machine is not running, the full control panel is available.
🔝 Top Toolbar (Idle)
From left to right:

-
⭐ Favorite
Mark or unmark a VM as a favorite. -
🎨 Tag Color
Assign or remove color-coded tags to organize your VMs. -
📊 Dashboard
View usage statistics across all VMs. -
ℹ️️ Quick Info
View Quick Info for the selected VM in Pop-up. -
🕘 Snapshots
Open the snapshot manager. -
🕘 Checkpoints
Open the Checkpoint manager. -
⚙️ Configuration
Edit the selected VM’s settings. -
📁 Templates
Manage reusable VM templates. -
➕ Create VM
Launch the virtual machine advanced creation wizard. -
⚡ Quick Create VM
Launch the virtual machine quick creation screen. -
❓ Help
Control Center Help
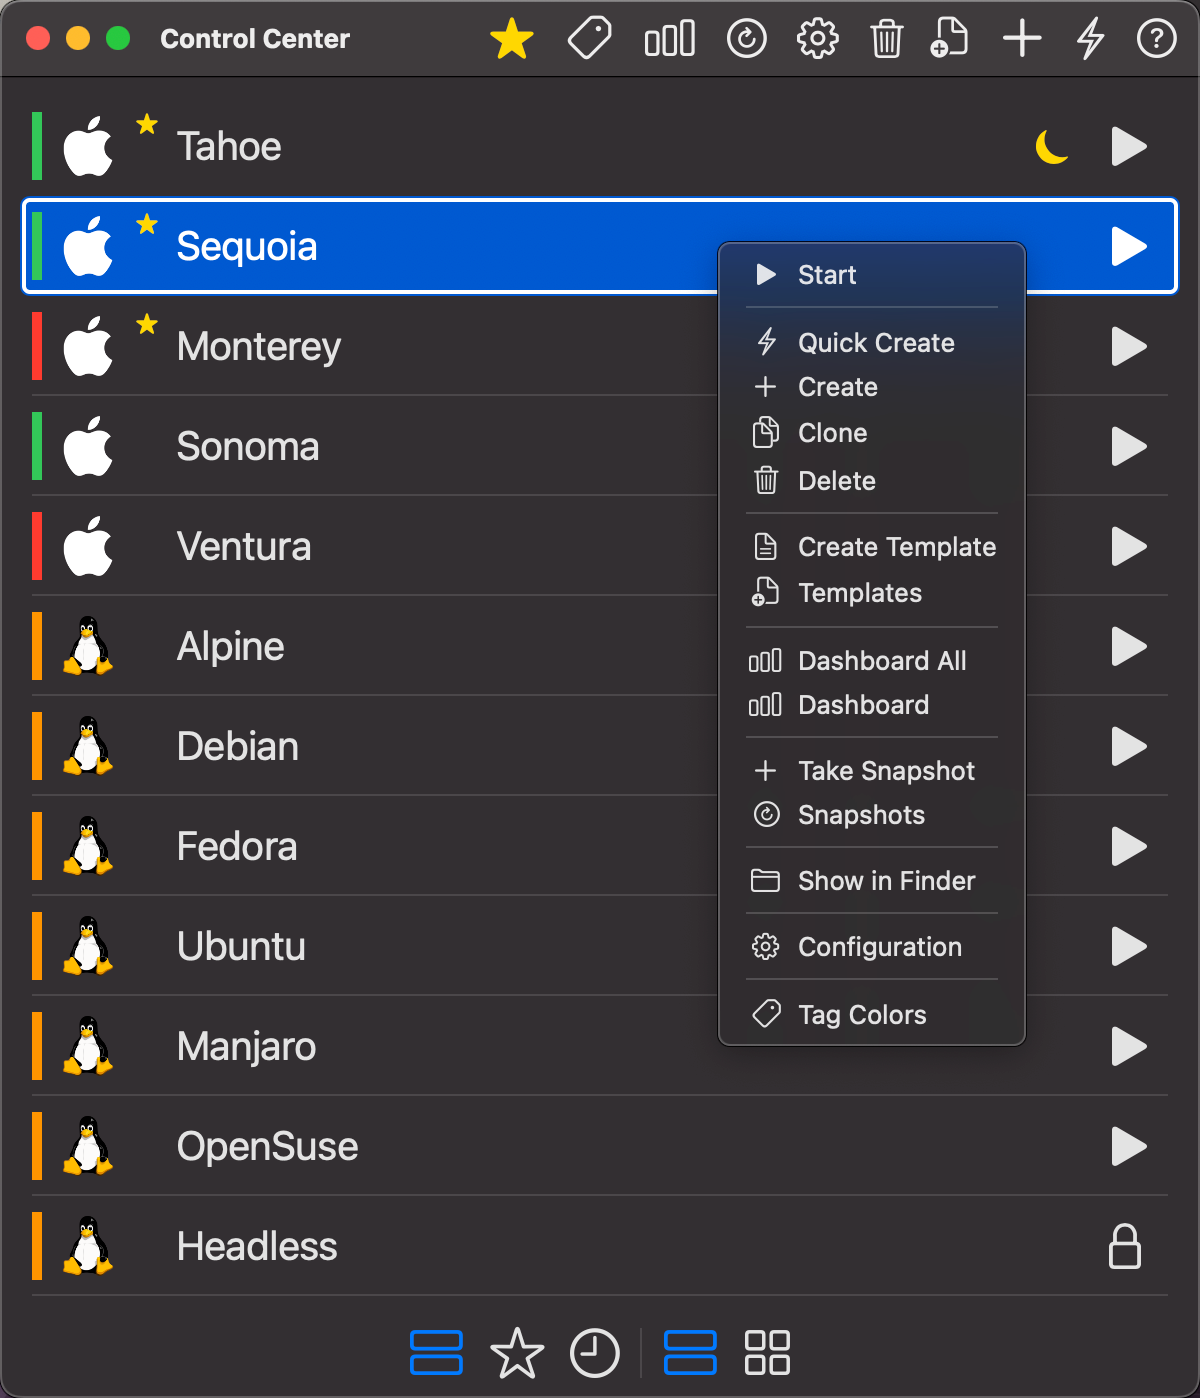
🖱️ Right-Click Context Menu
Right-clicking an idle VM opens the context menu:
- ▶️ Start – Launch the VM
- ⚡ Quick Create - Open Quick Create VM
- ➕ Create – Create a new VM
- 🧬 Clone – Duplicate the selected VM
- 🔗 Create Linked Clone – Fork the VM without copying its disks (macOS 27 Golden Gate or later)
- 🗑️ Delete – Delete the selected VM
- 📤 Export – Export the selected VM
- ✏️ Rename – Rename the selected VM
- 📁 Create Template – Save as reusable template
- 🧩 Templates – Open templates manager
- 📊 Dashboard All – View dashboard across all VMs
- 📈 Dashboard – View VM-specific usage
- 📸 Take Snapshot – Capture current Full VM state
- 🕘 Snapshots – Manage snapshots
- 📸 Create Checkpoint – Capture current VM state as incremental checkpoint
- 🕘 Checkpoints – Manage checkpoints
- 🗂️ Show in Finder – Reveal in Finder
- 🪵 Diagnostic Logs – Collect diagnostic logs for troubleshooting
- ⚙️ Configuration – Edit VM settings
- 🎨 Tag Colors – Apply tag color
- 🗂️ Assign Group – Assign VM to a group
🔗 Linked Clone Badge
If a virtual machine is a Linked Clone, its parent VM's name appears next to a link icon (🔗) in both List View and Grid View. Clicking the badge selects the parent VM, so you can quickly jump between a clone and the VM it was forked from.
🌙 Suspend Indicator Icon
If a virtual machine is currently suspended, a yellow suspend icon appears in the list.
⏸ Pause Indicator Icon
If a virtual machine is currently paused, a yellow pause icon appears in the list.
▶️ Quick Start Button
Each virtual machine in the list has a play button (▶️) on the right. Clicking this launches the VM instantly.
🔒 Lock Button
If a virtual machine is password-protected, a lock icon (🔒) appears instead of the quick start button. Clicking the lock prompts the user to enter the VM’s password. Once authenticated, the lock is released, allowing the user to start and interact with the virtual machine as usual.
This feature helps prevent unauthorized access and ensures sensitive virtual machines remain secure.
👆👆Double-Click to Start or Focus VM
Double-clicking a virtual machine in the List will start the VM if it’s not running, or bring its window to the foreground if it is already started,
☑️ Batch Selection
Select multiple virtual machines at once to perform actions on all of them in a single step.
- Cmd+click a VM to add or remove it from the selection. Works in both List View and Grid View.
- A batch action bar appears at the bottom of the list when more than one VM is selected.
Batch Action Bar
The batch action bar shows contextual buttons depending on the state of the selected VMs:
| Button | Action |
|---|---|
| ▶️ Start | Start all selected VMs that are not currently running |
| ⏻ Stop | Force-stop all selected running VMs |
| ⏹ Shutdown | Gracefully shut down all selected running VMs |
| 🗂️ Assign Group | Assign all selected VMs to a group |
Tip: Use batch stop or shutdown at the end of the day to wind down all running VMs in one click.
🖥️ Running Virtual Machines
When one or more virtual machines are running, the Control Center interface adapts to show power management controls and a streamlined toolbar.
🔝 Top Toolbar (Running)
From left to right:

- ⭐ Favorite
Mark or unmark a VM as a favorite. - 🎨 Tag Color
Assign or remove color-coded tags to organize your VMs. - 📊 Dashboard All
View usage statistics across all VMs. - ℹ️️ Quick Info
View Quick Info for the selected VM in Pop-up. - 📁 Templates
Manage reusable VM templates. - ➕ Create VM
Launch the virtual machine advanced creation wizard. - ⚡ Quick Create VM
Launch the virtual machine quick creation screen. - ❓ Help
Control Center Help
⚙️ Configuration, and Snapshots options are not shown while the VM is running.
⏻ Power & Shutdown Buttons
When a VM is running, each item in the list shows two control buttons on the right:
- ⏻ Power Off – Forcefully shuts down the VM (hard stop).
- ⏹ Shutdown – Performs a graceful shutdown (if supported by the guest OS).
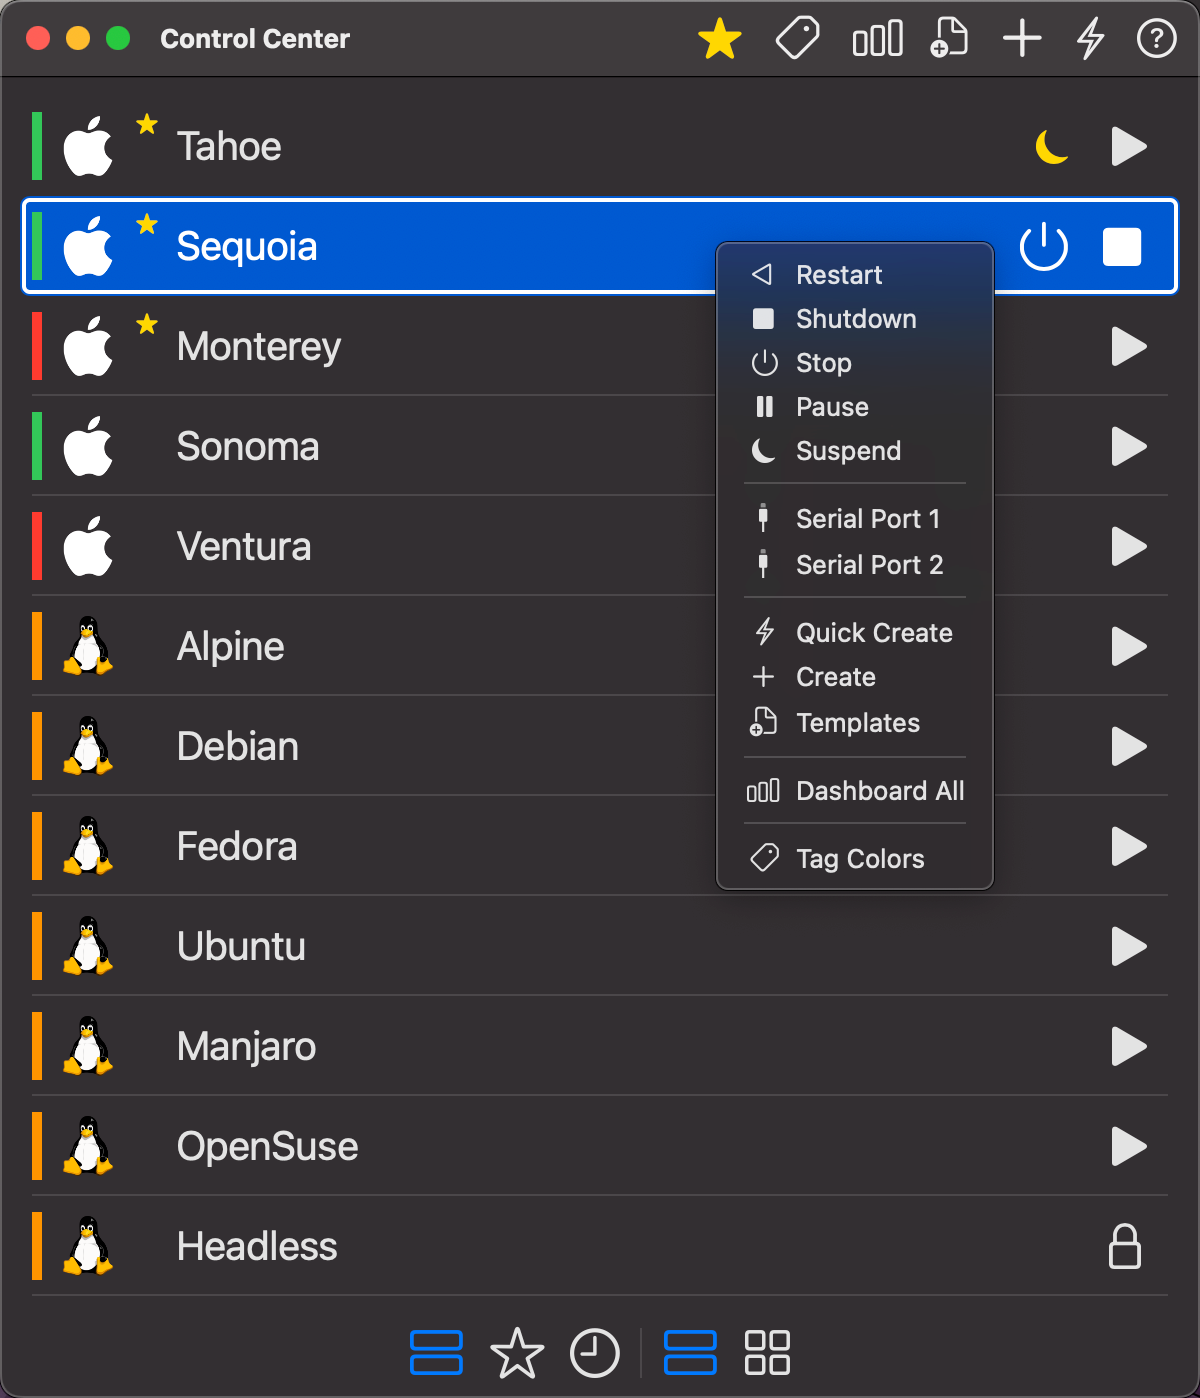
🖱️ Right-Click Context Menu
Right-clicking on a running VM shows the following options:
- < Restart – Immediately stops the VM and then starts it again.
- ⏹ Shutdown – Initiates a graceful shutdown
- ⏻ Stop – Immediately stops the VM
- ⏸ Pause – Pause the VM
- >⏸ Suspend - Suspends the VM (Apple Silicon with macOS 14 onwards)
- 🖥️ Open Display – Opens a display window for the VM. Available for headless VMs (when a display is configured) and background VMs (VMs running with the Background window-close behaviour). Clicking this reattaches a full VM window with all controls.
- 📟 Serial Port - Open serial port terminal or redirected file.
- 🔌 USB Devices – Attach or detach USB devices to the running VM. Each USB device connected to VirtualProg appears as a menu item — select one to attach it, or select an already-attached device to detach it. Available on macOS 27 Golden Gate or later.
- 🧠 Memory Balloon – Adjust the amount of memory given to the guest at runtime. Available on Linux VMs with the memory balloon device enabled.
- ⚡ Quick Create - Open Quick Create VM
- ➕ Create – Create a new VM
- 📁 Templates – Open template manager
- 📊 Dashboard All – View aggregate usage
- 🎨 Tag Colors – Modify tag colors
- 🗂️ Assign Group – Assign VM to a group
Note: The Suspend option is available only for Apple Silicon with macOS 14 onwards. It is not supported in Intel Macs.
⬇️ Bottom Toolbar
From left to right:

- 📄 All – Show all VMs
- ⭐ Favorites – Show only favorites
- 🕘 Recent – Show recently used VMs
- 🎨 Tag Color Filter – Filter by Tag colors
- 📃 List View – Display in a vertical list
- 🧩 Grid View – Display in a grid layout
- 🔍 Search – Show hide Search bar
- 📦 Extras – Show or hide CPU, RAM, disk usage, IP address, and next scheduled event in the VM list
- ↑↓ Sort – Sort Options
The Control Center gives you total control over your virtual environment, with a design that adapts intelligently based on VM states to keep your workspace efficient and clutter-free.
🗂️ Groups
Groups let you organise your virtual machines into named sections in the Control Center. When grouping is enabled, VMs are displayed under their group headers in both List View and Grid View.
Enabling Groups
Groups must be enabled in Settings → General → Groups. Once enabled, the group structure appears in the Control Center and the Assign Group option becomes available throughout the app.
Assigning a VM to a Group
There are two ways to assign a VM to a group:
- Right-click a VM → Assign Group — opens the group picker for that VM.
- Batch selection — Cmd+click to select multiple VMs, then click Assign Group in the batch action bar to assign them all at once.
The group picker lets you:
- Select an existing group from the list.
- Type a new group name and click Add to create it on the fly.
- Click Remove from Group to ungroup a VM.
Group Header Controls
Each group header in the list shows inline action buttons:
| Button | Action |
|---|---|
| ▶️ Start | Start all VMs in the group that are not currently running |
| ⏻ Stop | Force-stop all running VMs in the group |
| ⏹ Shutdown | Gracefully shut down all running VMs in the group |
| ✏️ Rename | Rename the group |
Renaming a Group
Click the pencil icon on the group header, enter the new name, and press Return or click Rename. Renaming updates all VMs that belong to the group automatically.
Ungrouped VMs
VMs that have not been assigned to any group appear together under an Default section.