🖥️ Virtual Machines
The Virtual Machines tab is the default view. It shows all your VMs as cards.
Summary Bar
At the top, four summary tiles show the total count of VMs in each state at a glance:
- Total — all VMs
- Running — currently active
- Stopped — powered off
- Paused / Suspended — frozen or saved to disk
Search, Filter & Sort
Above the VM grid, a toolbar lets you narrow down the list:
- Search — type any part of a VM name to filter cards instantly
- State pills — click All, Running, Stopped, or Paused to show only VMs in that state
- Sort — choose Name A–Z, Name Z–A, or By State
Filters and sorting are preserved during auto-refresh.
Grid and List View
Use the ⊞ / ≡ toggle buttons in the toolbar to switch between the default card grid and a compact table view. The table view shows all VMs in a single scrollable list with columns for name, distro, status, CPU/RAM, IP address, and uptime — useful when you have many VMs. Your preference is saved and remembered across sessions.
Creating VMs
The toolbar provides two ways to create a virtual machine — a quick path for getting started fast, and a full-featured dialog for complete control over hardware configuration.
Quick Create
Click the + Quick VM button on the left side of the toolbar to open the Quick Create dialog — a streamlined form covering only the essentials.
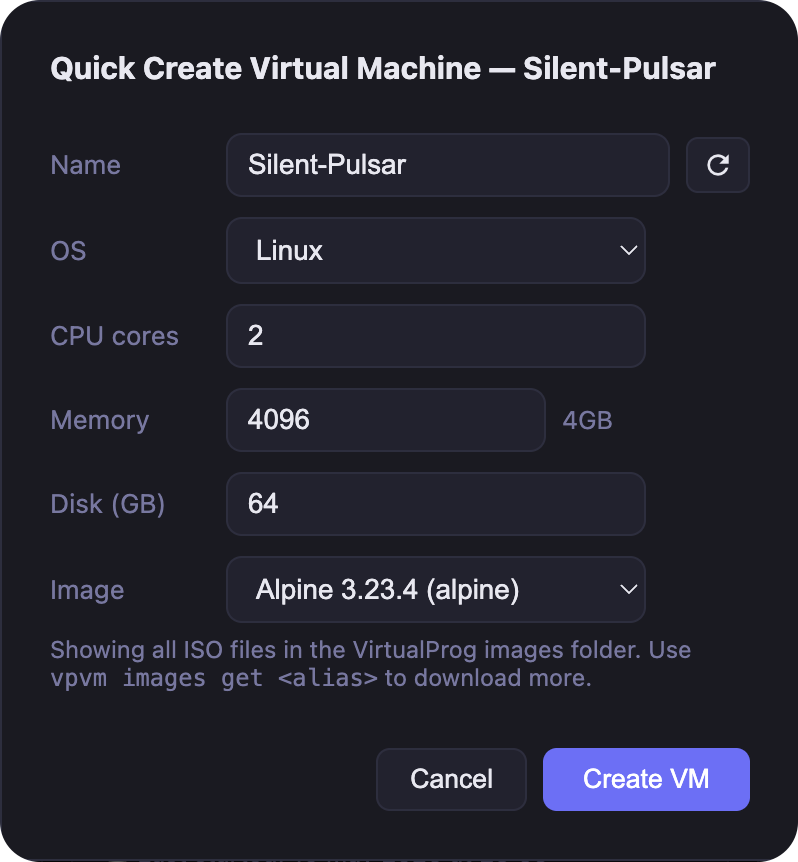
| Field | Description |
|---|---|
| Name | A unique name — auto-generated on open, or type your own |
| OS | Linux or macOS (macOS requires Apple Silicon) |
| CPU cores | Number of virtual CPUs (minimum 1) |
| Memory | RAM in MB — a live hint shows the equivalent in GB |
| Disk (GB) | Size of the primary virtual disk |
| Image | Select from all ISO or IPSW files in the VirtualProg images folder |
| DFU Restore (macOS only) | Enable if the standard macOS installation fails — switches to Apple's DFU restore path |
| Headless | Run without a display window — useful for server or background VMs |
The Image dropdown automatically shows only files relevant to the selected OS — ISO files for Linux and IPSW files for macOS. Known images are displayed with their friendly name and alias (e.g. Ubuntu 26.04 LTS (ubuntu)); any files you have placed directly in the images folder appear by filename.
Click Create VM to submit. The VM is created in the background — a toast notification confirms success, and the VM list refreshes automatically.
Create Virtual Machine
Click the ⚙ New VM button to open the full Create Virtual Machine dialog. This gives you complete control over every aspect of the new VM's hardware.
The dialog is organised into sections accessible from the sidebar on the left. The VM name in the title bar updates live as you type.
Sidebar sections
| Section | What you configure |
|---|---|
| General | Name, OS, distro/version, notes, headless mode, full screen, nested virtualisation, entropy |
| Resources | CPU core count, memory (MB), memory balloon |
| Display | Resolution mode (auto / force), width, height, PPI |
| Sound | Audio input and output device toggles |
| Input Devices (macOS only) | Keyboard and mouse device type — choose Mac for modern guests or Legacy for Monterey |
| Startup & Shutdown | Auto-start, startup delay, host sleep / shutdown / window-close behaviour, AutoPause |
| Image (macOS only) | IPSW restore image to attach |
| Provisioning (macOS only) | Auto-create a user account on first boot (macOS 27+) |
| Rosetta (Linux only) | Enable Rosetta translation layer for running x86_64 binaries on Apple Silicon Linux guests |
| Boot Disk | Select which disk or CD/DVD the VM boots from — options update automatically as you add or remove devices |
| Security | Password protection (set, change, or remove the VM password), clipboard sharing, screenshot, screen recording, and dashboard log access controls |
| Auto Snapshots | Automatic snapshot schedule — prefix, type (On Start, Daily, Weekly, Monthly, On Shutdown), and maximum snapshots to keep |
| Schedule | Automatic start and stop times by day of week |
| Webhooks | HTTP POST notifications sent to external URLs whenever this VM changes state |
| SSH | Store a username, port, and password or private key for one-click web SSH auto-connect |
| Disk 1 … N | Size, interface (VirtIo / NVME), type (Dynamic / Fixed), cache mode (Auto / Cached / Uncached), sync mode (Full / FSync / None) |
| Network 1 … N | Type (NAT, bridged, or custom), MAC address, static IP suffix, port forwarding rules |
| Network Block Device 1 … N | URL of the remote NBD block device to attach |
| CD/DVD 1 … N | ISO image to mount as a virtual optical drive (available for both Linux and macOS VMs) |
| Serial Port 1 … N | Serial port mode (Console / Pipe / File), path, and terminal theme |
Adding and removing devices
Use the + button at the bottom of the sidebar to add a disk, network, Network Block Device, CD/DVD, or serial port. Select an entry and click the 🗑 button to remove it. At least one disk and one network are required.
Custom networks
When Custom is selected as the network type, a Static IP field appears. Entering a suffix (2–254) assigns a fixed address to the VM on that network. With a static IP configured, a Port Forwarding table also appears — add rules to map host ports to guest ports over TCP or UDP.
Click Create VM to submit. Use vpvm images get <alias> or the Image Catalog to download boot images if the image list is empty.
VM Cards
Each card shows the VM name, OS/distro, current state, CPU, memory, and IP address (displayed when the VM is running and an IP has been assigned). Action buttons are shown directly on the card and update based on the VM state:
| State | Available Actions |
|---|---|
| Stopped | ▶ Start, ⚙️ Configure, 🗑 Delete |
| Running | ■ Shutdown, ⏻ Stop, ⏸ Pause, ↺ Restart, 💾 Suspend, 🖥 Connect (non-headless only) |
| Paused / Suspended | ▶ Resume |
The ⚙️ Configure button opens the full Create Virtual Machine dialog pre-populated with the VM's current settings, letting you edit all hardware and behaviour fields. In edit mode:
- Name — the name field is editable; changing it renames the VM when you save
- Disks — shown read-only (size and type cannot be changed on an existing VM)
- Networks — fully editable, including static IP, port forwarding rules, and adding new networks
- All other sections (Display, Sound, Startup & Shutdown, AutoPause, Auto Snapshots, Schedule, Webhooks, Boot Disk, Security, Provisioning, Serial Ports, Network Block Devices, CD/DVDs, Input Devices, Rosetta) are fully editable
Running VMs show ▶ Running for Xh Ym on the card so you can see at a glance how long a VM has been up.
Password-protected VMs display a 🔒 badge on their card (grid view) or beside their name (list view) so you can identify them at a glance.
Password-Protected VMs
When a VM has password protection enabled, actions that control or modify it are gated behind an unlock step.
| View | Indicator |
|---|---|
| Card grid | 🔒 badge in the card header |
| List view | 🔒 icon beside the VM name |
| Stopped VM Start button | Shows as 🔒 Unlock & Start |
Clicking any protected action — Start, Configure, Delete, Clone, or Rename — on a locked VM opens the Unlock dialog before the action runs.
Unlock Dialog
Enter the VM password and click Unlock (or press Enter). If the password is incorrect, an error message is shown and you can try again. Once accepted, the original action executes immediately.
Locking and Unlocking via Web CLI
You can also manage the lock state directly from the Web CLI Terminal:
Unlocks the VM for the current session. Control operations (start, stop, etc.) and configuration changes are permitted until the VM stops or is explicitly re-locked.
Re-locks the VM immediately without stopping it. The password is required again for any subsequent protected action.
Only VMs with a password configured can be locked. Attempting to lock a VM with no password returns an error.
Bulk Actions
You can act on multiple VMs at once:
- Hover a card to reveal its checkbox, then check the VMs you want to select. In list view, checkboxes are always visible.
- A bar slides up from the bottom showing how many VMs are selected, with Start, Shutdown, Stop, and Clear buttons.
- Actions are smart — Start only applies to stopped or suspended VMs; Shutdown and Stop only apply to running VMs.
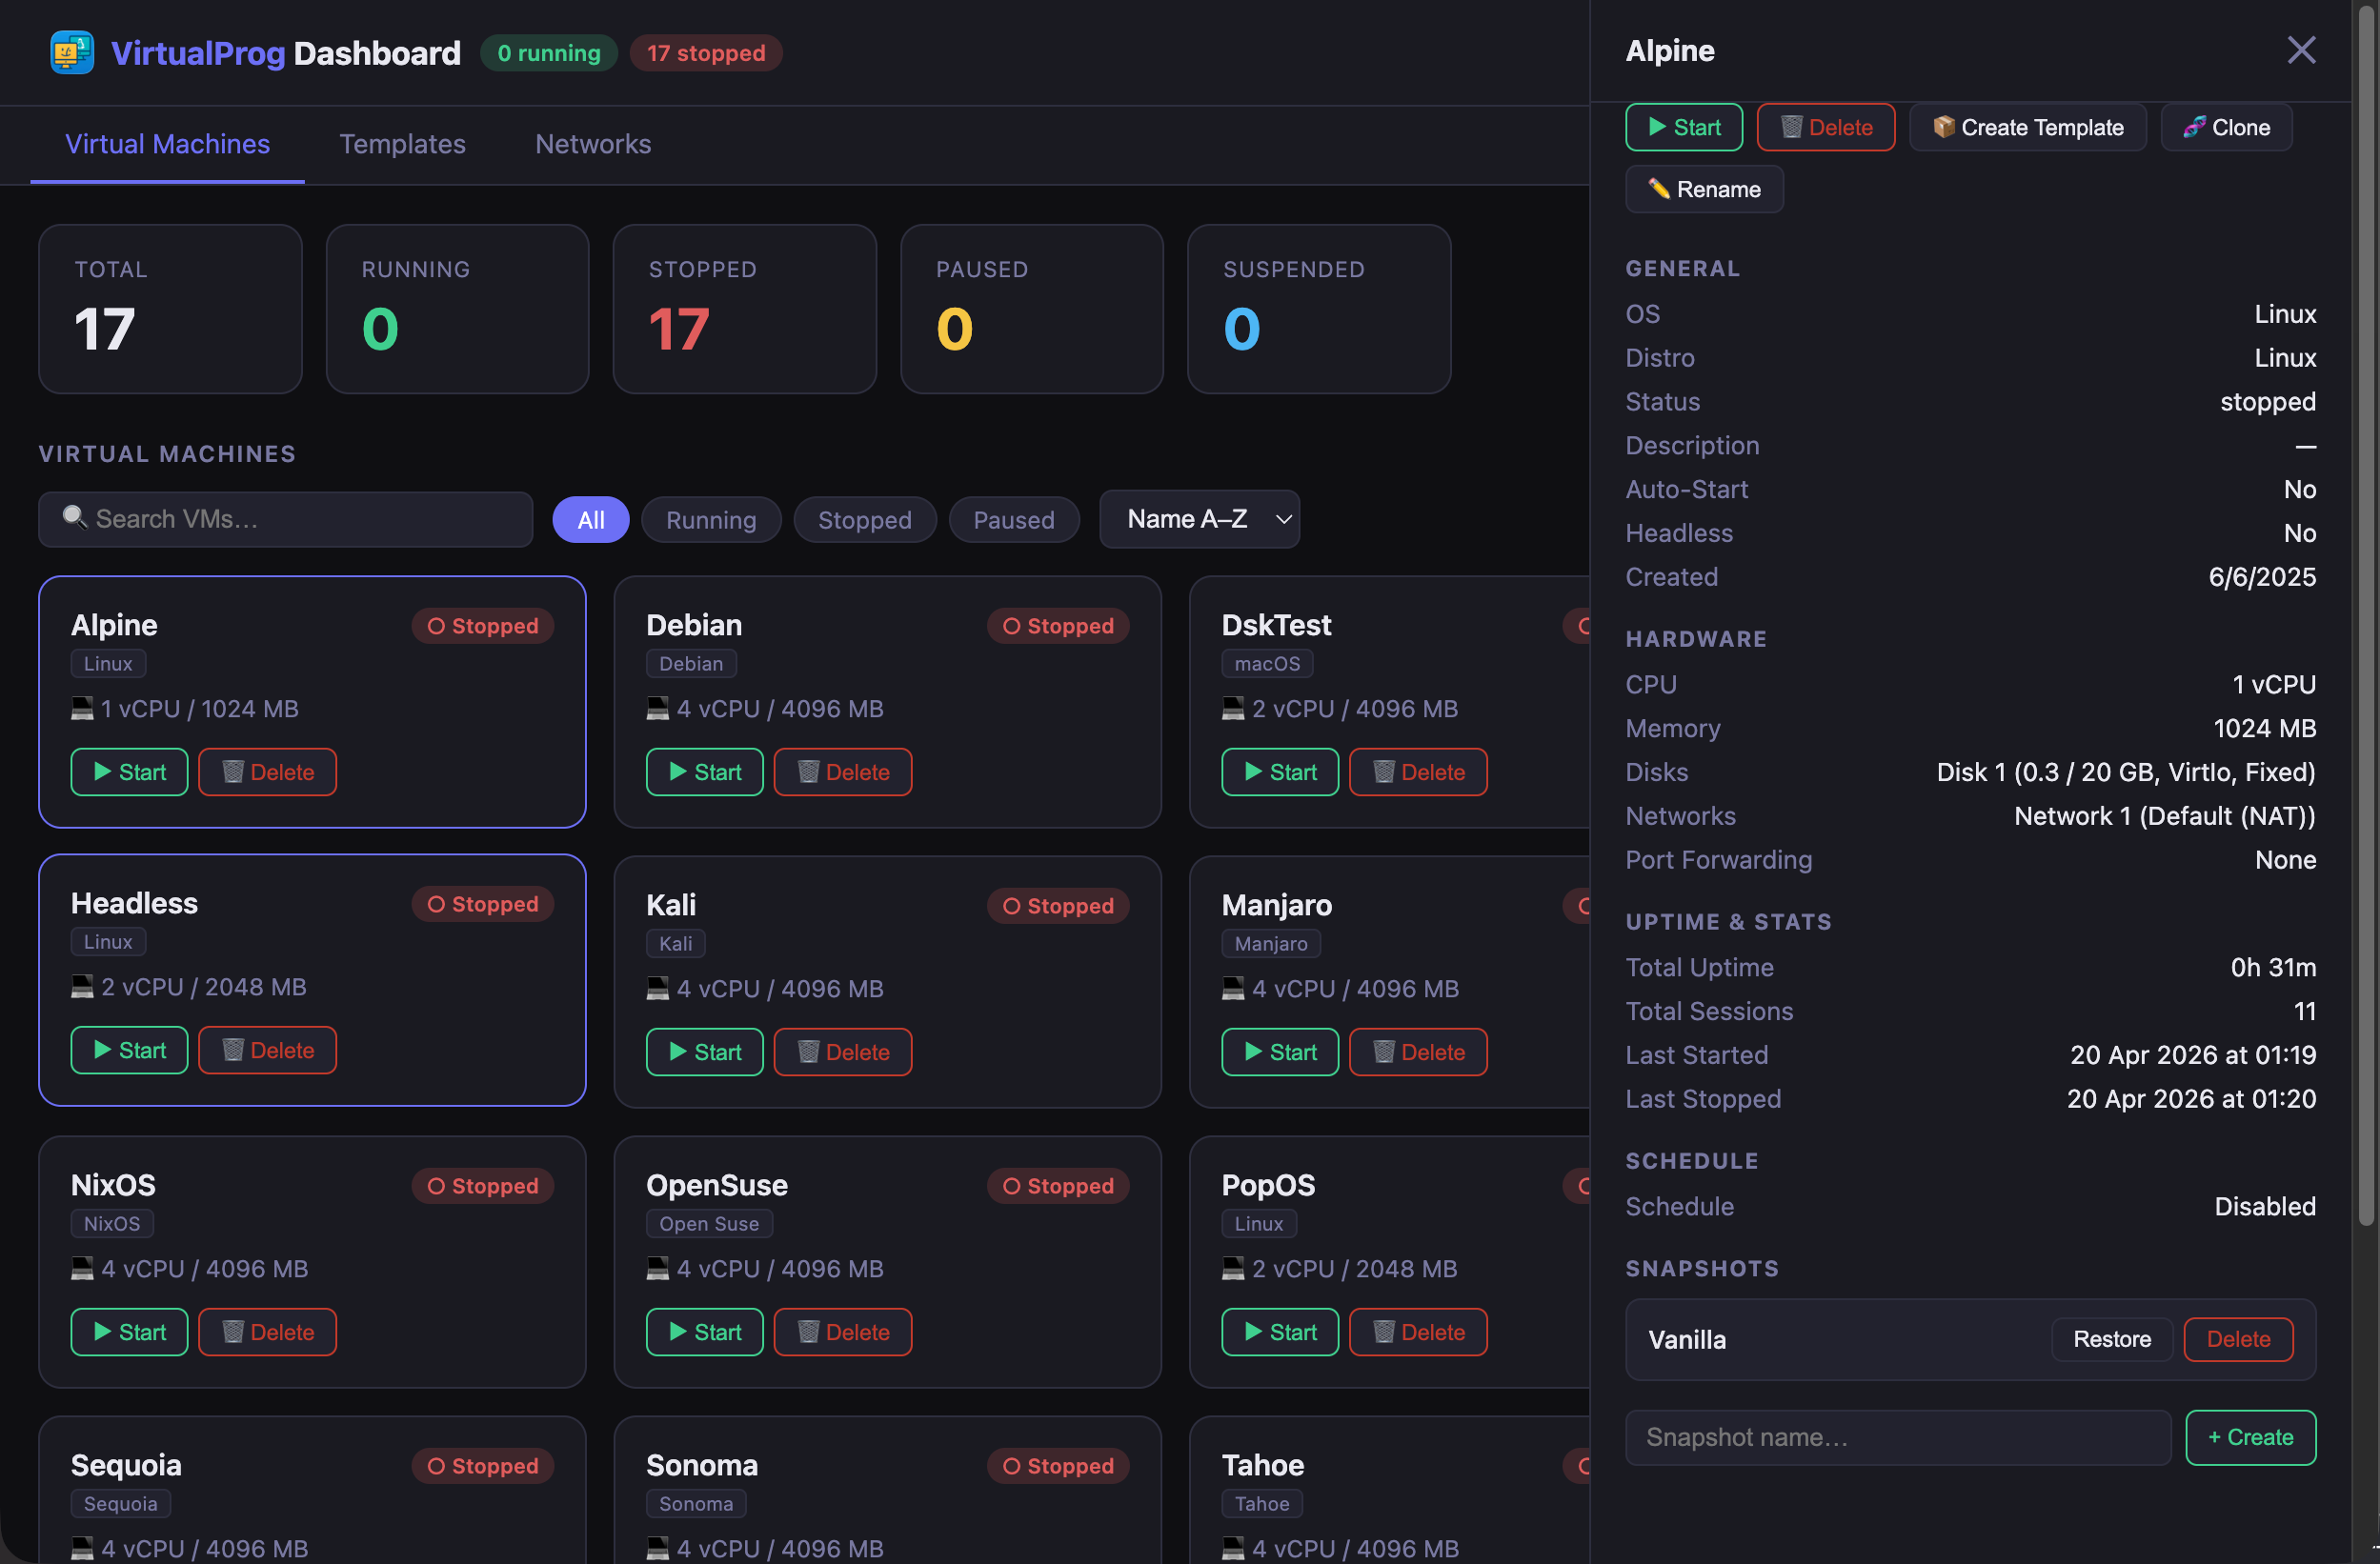
VM Detail Panel
Click any VM card to open the detail panel on the right. It shows full configuration and hardware details and uptime statistics.
From the detail panel you can also:
⚙️
| Action | Description |
|---|---|
| 📦 Create Template | Save a stopped VM as a reusable template |
| 🧬 Clone | Duplicate a stopped VM under a new name |
| 🔗 Create Linked Clone | Fork a VM instantly — shares parent's disk, stores only its own changes |
| ✏️ Rename | Rename the VM — enter the new name in the dialog |
| 🖥 Connect | Remote Control the VM from your browser |
Console Ports
If a VM has one or more serial ports configured in Console mode, a Console Ports section appears in the detail panel. Each port shows an Open Web Console button that launches the browser-based terminal for that port.
To configure a serial port as a console port, open the VM configuration in the VirtualProg app, go to Serial Ports, and set the mode to Console.
SSH Connect
When a running VM has at least one resolved IP address, an SSH section appears in the detail panel below Console Ports.
The Username field is pre-filled automatically if you have stored SSH credentials in the VM's SSH configuration. You can edit it before connecting.
| Button | Action |
|---|---|
| Web SSH | Opens a full in-browser SSH terminal — no local SSH client needed. See Web SSH. |
| SSH into VM | Opens an ssh:// URI — on macOS this launches your registered SSH client (Terminal, iTerm2) and copies the SSH command to your clipboard. |
If the VM is running but no IP has been assigned yet, the section shows Waiting for IP… until one resolves.
One-Click Auto-Connect
If you have stored a username and credential in the VM's SSH configuration tab, clicking Web SSH connects immediately — the credential form is skipped entirely. See SSH Configuration for how to store credentials.
Memory Balloon
When a running Linux VM has Memory Balloon enabled, a Memory Balloon section appears at the bottom of the detail panel. This is particularly useful for headless VMs that do not have a remote control screen open.
| Field | Description |
|---|---|
| Configured | The total memory allocated to the VM |
| Target | The current balloon target — memory actively available to the guest |
| Reclaimed | Memory returned to the host (Configured minus Target) |
Use the slider to set a new target, then click Apply. Click Reset to Max to return the target to the full configured amount.
Memory Balloon must be enabled in the VM's Resources configuration and the
virtio-balloondriver must be loaded in the guest. The section is hidden when the VM is stopped or when balloon is not available.
Auto-Refresh
The dashboard refreshes automatically in the background. Use the ↺ Refresh button in the header to refresh immediately.
To change the refresh interval, click the ⚙ icon in the header and choose from 5 seconds up to 5 minutes, or select Manual only to disable auto-refresh entirely. Your preference is saved across sessions.